|
|
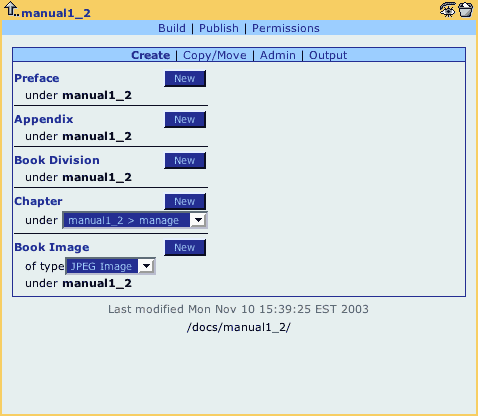
The Content Manager Details screen is reached by clicking on the name of a file or directory in the directory tree, or by clicking  in a search results or references list. It appears as a highlighted box to the right of the directory tree, and it refers to details of the highlighted directory or file in the tree. in a search results or references list. It appears as a highlighted box to the right of the directory tree, and it refers to details of the highlighted directory or file in the tree.

The highlighted section at top displays the file's title or name, and up to four icons:
-
 go to the details screen for the parent directory (mouseover to show parent path) go to the details screen for the parent directory (mouseover to show parent path)
-
 edit this file; opens the current revision in the default editor edit this file; opens the current revision in the default editor
-
 preview this file; opens a new window preview this file; opens a new window
-
 delete this file or directory delete this file or directory
Directly beneath this highlighted section, you will see up to three links that perform actions on the selected file or directory:
-
Build (opens report screen in new window)
-
Publish (opens report screen in new window)
-
Permissions (assign access rights to the file or directory)
Beneath these links, you might see a file's description, and you may also see a listing for a draft file if you had previously saved a draft, or if a previous editing session had timed out. You can edit, preview or delete the draft using the standard icons which appear next to the listing. Clicking the edit icon from the highlighted row at the top of the details screen opens the current revision, not your last draft; be careful to edit from the draft listing if you want to resume changes previously in progress, otherwise your draft file will be overwritten with a new working copy of the current revision.
Inside the details screen is the action box; this gives access to all the additional features available for the selected node, which may include creating new files, copying or moving the node, viewing references, revisions, or output files. All these additional actions are described in the next few chapters.
At the bottom of the details screen, you will see the last modified date of the node, and the full repository path of the node. This path can be used to reference the selected file from other areas in the site, for example to specify it as an include, link or image in another file.
|
|  |


